Monday, October 3, 2011

Testing Earth Sculptor

GeoControl2 makes very nice landscapes, but I would like to make fine adjustments to make it look just the way I want.  I could of course use the CS to do that, but I grow so tired of all the crashes. So I thought I try another 3D terrain tool, EarthSculpture (version 1.11). The unregistered copy has a max size of a map is 256x256 px, and a registered copy can handle up to 4096x4096px maps, which is just what I need.

I had some problems before I figured out how to make the imported map to get the correct size. The solution was really easy. When opening the program the first time it will open a default map of the size 257x257, and any height map I imported, regardless of size would be resized to 257x257. What I needed to do was to make a new map (File->New, chose 4097x4097). Now when I import an image of 4096x4096, it will be the size I wanted.

To be able to see the height properly in ES one can change the height. This will not change anything when the image is exported, only how the landscape is drawn. In the Terrain window there is a slider called Height. This goes from 0-300 as a default. This slider can be changed as 300 is a bit too small to see all the details. In the EarthSculptor folder there is a file called EarthSculptor.ini, it can be opened in a text editor. I change the “maxTerrainHeight” from 300.000000 to 2000.000000.
At the max height of 2000, I set the Water level to 51,58, this corresponds more or less with the water level in game (that is when I lower the land with -h -2048 in TESAnnwyn when I make the esp).

EarthSculptor is really easy to use, and has all the features that I need. With the help of brushes I can lower, raise the land, smooth and so on. 

Now I will play around some more and see what I can make :)

Tuesday, September 6, 2011

Some eyecandy

I have taken some screenshots from a long ride in the new landscapes.

These are from the westen lands called Andlang. First the vally of Tiwsborg, and then the plains that will be covered with forests.


Then I went to the east, where the river Vanir will work as the border of this section of the world. The town of Freigard will sit at the shore.


Whent for a swim in the river, took forever to get to the other side :)


Along river Vanir is were I originaly held my DnD roleplaying game. This is the site for the town of Skollsbro.

Riding up the vally from the town.


Looking down at Skollsbro from the mountain ridge.


These mountains are the border between two kingdoms, Vidblain in the west and Hoddminir in the east. On the other side from Skollsbro is the Hugin Vally, were my original game started. From the pass you can see down in the vally. I plan to make a lake there, with the village Åmot at the shore.


And no screenshot collection can be without sunsets :)
From along the Vanir river.


/E

Monday, September 5, 2011

A new more detailed world

When I tested my 16 x 16 quad world I felt there were some problem areas: The world felt too small for what I had in mind and the terrain was flattened out to much. I have now decided to divide the world into 5 pieces trying to use rivers and mountains as natural barriers between each section. The idée is that each section should be up to 16 x 16 quads. The mod will primarily be in section 1 and 2, but I worked a bit on 3, 4 and 5 as well to have the height map ready if I ever want to expand the mod more. The idée is that the player can’t cross the mountains except for specific mountain passes, and that the two large rivers are too big to swim, so they can only be crossed by boat or bridge. I have to figure out how to make connections between the separate sections, but that will have to be a later problem.


The next issue was the flattened feeling of the world. I fixed with a lot of work in GeoControl2 and PS.
First, GeoControl works best if the height range of the image is between 100-0%, not 100-76% gray that is what Oblivion can handle (see previous posts). I had my map in 100-76%, so I fixed it with the brightness function in PS. Image -> Adjustment -> Brightness/Contrast. I changed the brightness to +150 two times to get the height range I needed.
I divided the height map image in to sections of 4096x4096 pix + an overlap with the next section, so the final size of each section was 4608x4608. I used the guide tool in PS to make sure that everything was strait (View->New Guide-> vertical and horizontal lines in pix on image). I then had to resize each section to 4096 to be able to run them in GeoControl.
First I used High sedimentation-invers and High fluvial terraces-invers to get sharp edged mountains. Then I run Thin flows deep-invers, Thin flows sediment, Thin flows deep and Mountains ridged to get the nice eroded effects I wanted.
I have put a zip file here with the settings files if anyone is interested.


Next problem was to glue everything back together again. The exported files from GeoControl were first resized again to 4608pix so they could overlap, and then with the help of the guide lines I could put them back in the original image where they belonged.


Now there wasn’t a perfect match between sections, as you can see, so before I merged the layer together I had to even things out. I erased some of the overlapp from one section and it worked, I could not see the division anymore.


One new problem was that much of the big rivers had disappeared when GeoControl did its thing. I solved the problem by making a separation in the height map in PS, painting in a “lower” color in the gap. The borders between land and river didn’t look so good, the edges were to sharp. I divided it into sections with overlap, run it in GeoControl, and glued it back together again. The result was a big nice looking river!


Last thing to do before I turned the height map into an .esp file with TESAnnwyn was to lower the colors back so the range was in between 100 and 76% gray again, by the use of Brightness -150 two times in PS. There was a high mountain that needed fixing with more lowering, but it was only a small area.


The darker height map doesn’t look much in GeoControl, but in game those mountains are huge! And they have lots of details too :)


/E

An in-game Map


There are two guides that I have read for making an in-game map, Silgrad Towers guide for an in-game map and Nexus Wiki, Oblivion custom in-game map.
First I needed an image for my in-game map, as a start thought I use a 2D representation from GeoControl. I took the 16384 x 16384 pix height map image and resized it to a resolution Geocontrol can handle 2048 x 2048, and saved it as a tif, 16 bit grayscale. In Geocontrol I exported a image of the landscape. Generation -> Image Export / Colour -> jpg


The max size that Oblivion can handle for an in-game map is 2048 x 2048, and it also has to be in an image format the game recognizes, a dds file. I used a plug-in for GIMP to convert my jpg to a dds.

One of the guides said to put the image file in Data\Textures\map\”your­_mod_name”, the other in Data\Textures\Menus\map\world\, I used the later and it have worked fine.
In the CS, I loaded my esm, World -> World spaces. Under Map Data, Add Image File, brows to where the file is located.
Usable Dimensions X: 2048 Y: 2048 (this is the size of the map).
Cell Coordinates NW Cell X: -256, NW Cell Y: 255, SE Cell X: 256, SE Cell Y: -255 (the cells the map should cover).
Save as a new esp.
When I test it out in the game, I mark both my esm and the map esp.


Works really well :)

/E

Thursday, August 25, 2011

Generating LOD

There are LOD and VWD (visible when distant), right now I don’t have anything in my terrain so no VWD are needed. LODs are made in two steps, first a mesh is needed. This can only be done in the CS. Open the CS and load the esp/esm file, it doesn’t have to be active. Open the height map editor, select your world space and regenerate on overview (under View) so the map can be navigated. The LOD mesh is made for 2x2 quadrants at a time. When navigating the overview, answer no to the question if the texture should be saved, we have another program that can do this faster and more stabile too, my CS tend to crash when saving the textures. Navigate to a 2x2 quad, go to File -> generate LOD (full). This will take some time. The LOD mesh have to be generated for each 2x2 quad separately, so a large 16x16 quad map will take time, it took me about 1,5 h to do. A test 4 x 4 quad map will go much faster.

The next this is a texture that will be placed on top of the mesh. Here is where TES4qLOD will come in, it will make DDS texture files of the landscape. Type in the name of the world space (same that you chose when opening in the CS height map editor) and the name of the esp or esm. You can also chose between 1024, 2048 or 4096 resolution of the textures. The 1024 is default and will be good for now. The TES4qLOD can also make full normal maps using the -n –f function. When I have my final terrain with trees and different textures I will have to make a new LOD, and VWD. But for now I just want to test my terrain out in game.
Now here is an important thing, as far as I can figure out, every time I merge a “change” esp to the esm, the ID of the esm will change. Both the LOD mesh and textures names are specific to a ID. Do the LOD as the last thing or rename the LOD images and NIF files to the new ID. This is ok for a small map with not so many files, but very impractical on a large map with hundreds of files. I used the Better file Rename software to do this job for me. I don’t know if this could be avoided somehow in the TESGecko, there might be a function where you set the ID for the new file. I also don’t know how you can see the ID in the CS, but an easy way is to just generate one new LOD in the height map editor and then look what ID name the file got. The mesh .NIF files are in \Oblivion\Data\Meshes\Landscape\LOD, and the texture files are in Oblivion\Data\Textures\landscapelod\generated. The name format is IDnumber.startcellx.startcelly.numberofcells, like this one 26524497.64.96.32.dds .Making LODs does not require any savings of the esp/esm, it worked for me anyway.
These are from a 4 x 4 quad of my map. I got some nice dramatic looking mountains. The world feels way to small, and most of the terrain, like the mountains are un-navigable.


A quick way to navigate around in the landscape once you have loaded the game is to open the console. Open the console ~ (or § on a Swedish keybord). Type: COW WorldSpacename 0,0 to exit the console press ~ again. 0,0 are cell coordinates, type which ever you want to visit.
To make the world in a better scale (probably still to small) I rescaled the raw image in PS to 16384 x 16348 px, made a new esp with TESAnnwyn. The CS can only show a 16 x 16 quad map in the overview window, this is a great limitation if I want to bigger maps. Without the overview I can't navigate in the height map editor, and there is no other way that I have found to make .nif file of the landscape without the CS.
With a 16 x 16 map, the cells of the map have to be shifted when making the esp in TESAnnwyn to fit in the overview window, center is always cell 0,0. I run the TESAnnwyn with -x -255 and -y -255 to ofset the map so it will fit.
I converted the esp to an esm in Gecko, made new LOD meshes and textures. This toke me most of one day to do. Then I went for a looong ride in my big world :)


Now the size of the world feels better. It's really nice to see the world I imagened come in to life in 3D :)
Rescaling the image lost some of the dramatics of the moutains and there are also some platue effects on low slops, but that is expected after a big rescale.
I will have to rework the height map to make it look better for this size (or bigger).
I now need an in game map, in a world this big it's hard to know where you are when navigating by landmarks alone.
/E


Making the map

Size of the map

In Oblivion the map is divided in to quadrants, “quads”. One quad is 1024 x 1024 pix when making a height map. One quad is made up by 32 x32 cells, each 58.5 x 58.5m in the game, that’s over 1 800 x1 800 km in game for one quad. The original Oblivion game is made up of about 4 x 4 quads. I have read that 4 x 4 quads is the max size that the CS can load, due to the 2G RAM limit the program has. For me 4 x 4 quads are not big enough. I have also read that there is possible to make bigger maps, both at TESAnnwyn site and at the at the Middle earth forum. Some have made 8x8, 16x16 and even up to 20x20 quad maps. This requires some workarounds, because I can’t open an .esp with a map bigger than 4 x 4 quads as an active file without the CS crashing, sometimes so bad that I have restart the computer.

In the CS a file can be opened as an active or inactive file. The CS can open both esp and master esm file, but it can only save esp files. Opening a file as inactive can be good for some things but a problem is saving. The inactive file will only be saves as a new esp file, and this will only have the changes done to the file, not any other information from the original file. This is the same thing that happens when trying to save an esm file.

When working with really big maps like a 16x16 quad map, this can be opened as inactive without crashing the CS, but the saved changes will be in a separate file as I mentioned before. There is a tool that will solve the problems this introduces. TESGecko can convert between esp and esm and can also merge esp to esm. With this handy tool I can make a big 16x16quad map, in TESAnnwyn, covert it to a esm in TES Gecko, open it in the CS an, make changes like add things and so on, save as a new esp that I then merge with the original esm file and the changes will show in the game.
The map

The map I had worked on for my role-playing game was made as an old fashion map. From this I had also made a crude height map with different grayscale colors for the hills and mountains. What was needed now was an image with more detailed height information. I painted with a different grayscale color, so all the height information is in different layers, this making it easy to make changes. Now I can use the research I did on % gray corresponding to what height in m. The world I have planed is huge so drawing the map took several months. This is a part of the map in layers.

Every % grayscale step equals to 75m height change in the game, which will look really crappy. To even out the edges I first had to merge the layers and then I used a mixer brush tool in PS. This tool blends the two colors togetter, making the edge fussier.

Introducing realistic erosion in the map
There are several height map editors with erosion functions, among them the CS. I have tried GeoControl2. They have a free full trial version for 30 days. GeoControl2 can generate random maps, but it can also import images, like a 16-bit tif. The max image size is 4096 x 4096 pix. GeoControl will also show a 3D rendering of the map, great to get a good visual of the terrain. First we have the layered map vs the fussed out edge map. Both looks kind of bad, but no fear, that’s what GeoControl is for.


A problem is the fact I only have a gray color range between 100-75% gray. In GC this looks kind of flat. I need a full range (ca 100-0%) for the functions of GC to work well.

GeoControl2 has a lot of functions that I haven’t learned get. I’m mostly interested in the possibility to introduce realistic erosion. Some testing of the functions are in order :) I used the test hill I made earlier and run it with the different settings. The hill is perhaps not the best starting object to test for all the settings, but it gives a general idée of what happens.


I liked the mountain ridge, thin flow deep inverse, thin flow sharp and thin flow deep, so I used these on my map.


Looks a lot better now :)


Now I want to test out my map in game, the 4096x4096 image was saved as a tif in GeoControl, and then resaved as a RAW in PS. One thing I have not said before, the TESAnnwyn will flip the image vertically, so to get the right north in game I have flipped the image vertically first in PS, and then the TESAnnwyn will flip it back. On the construction set wiki, in the WORLD building 101 tutorial, at the end there is a good method for setting up a new start place for a player that is not in the original game. To use the new esp in game, when starting Oblivion chose DATA, then mark the esp/esm files to start, then start the game. This is an image from a terrain made from my map to a 4x4 quad terrain (image map size 4096x4096). The terrain looks nice but there is no distant terrain showing. These are called LOD, and must first be generated.


/E

Monday, August 22, 2011

Making a Height map, part 2 – Height units


Some more investigation of what actually happens with the height map is needed before I proceed to my world map.
Gray scale in PS
To make a map the image needs to be 16-bit and grayscale. In PS you can change this under the tab Image -> Mode -> grayscale and 16-Bit. After the image is converted to grayscale, in the color tab you can chose the % grayscale. 100% is Black and 0% is White, so 50% gray has 50% black in it and so on. Whenever I talk about % gray, this is what I mean.
How I made my test height map images:

File -> New “2048 x 2048 pix, grayscale and 16-bit”. I have made the test “hill” using the gradient tool in PS. Use the bucket tool to make the background black (100%). With a circular selection tool I define the borders of the “hill”. You can have two colors selected in PS, I set the second to 55% gray. Now I can use the gradient tool (in the same place as the bucket), select circular in the settings, and drag from the middle in my selection in the image to the border.

Save as a RAW file, with the settings PC/IBM and header 0, it’s very important that the save settings are right or the TESAnnwyn can’t read it. If you want to open the raw file again in PS, use these settings: the right image size in pix, 16 bit, PC/IBM, 1 channel.
TESAnnwyn vs CS
After each conversion of the image to an .esp, the TESAnnwyn will tell you the min and max height of the map, in THU, GU and m. It will also tell you if there were over and underflows. I’m not entirely sure what over and underflows are.

Let’s take two examples, a 55% and a 80% grayscale hills (upper half of the image is the grayscale height map, the lower is the view from the CS Height map editor).

55%: min/max 0/29486 THU, min/max 0/235888 GU, min/max 0/3361m.
80%: min/max 0/9830 THU, min/max 0/78640 GU, min/max 0/1220m.
The TESAnnwyn reports a height of 3361m in the 55% gray hill, but when I open it in the CS Height map editor I see that it goes to ca 65 500 units in the z axel (height) and then flips to min height (no breaks in the mesh). The 80% gray hill on the other hand has a max height of 1220m (in TESAnnwyn), in the CS Height map editor I get ca 56 300 in z units. There is something here I don’t get, to me it looks like the TESAnnwyn reports a higher height than what the CS can handle, so the CS flips the height to min. Like in the case of 55% gray, the TESAnnwyn reported height of 3 361m is actually only ca 1 700 m, then flip to min and builds up to ca 1 700 m again.

I want to find a range of grayscale that will give me unbroken but high terrain.
From this a 75% gray test map looks almost good, still flips to min, but only at the very top. At my current settings of the TESAnnwyn 100% will be at 0m in game, this is just at/above sea level. I would like the map to go from under sea level and up to the highest mountain. This I can do with the –h (height alteration) function in TESAnnwyn, and depending on how low I want the sea I set different levels. -4096 (-58m) or -8192 (-116m) are good options.

With the -h -8192 setting in TESAnnwyn the 75% gray is the lightest I can use. According to the TESAnnwyn this gives me:
75% h -8192: min/max -1024/15358 THU, min/max -8192/122864 GU and min/max -116/1750 m.
Grayscale % vs. THU/GU and m in game?
When making the map it could be good to know what % gray gives what height with the setting of -h-8192. So I tested this and here the results:

/E

Sunday, August 21, 2011

Making a Height map, part 1 – Height units

Many of the guides to make Height maps I have read were based on the use of Fractal mapper, TES4 Construction Set or GeoControl. These tools make new or random maps, which you can then change. I already had a world planed out and it felt like a lot of work to redraw everything again. I will start by going throught the trial and errors I have tested to figure out how to make my map functional in TES4 Oblivion. So I did a basic simple height map in PhotoShop/Gimp2. A height map is an image file where the color value corresponds to a height in the landscape. Black is low and white is high.
Height units used in Oblivion
This can be a bit confusing (not sure I have completely figured it out get). The Construction set wiki has a good over view.
Now I also have to mention a really useful tool TESAnnwyn, a program that can among other things converts height map images in to esp files (see Link list). It’s a lot faster than the CS (Construction Set) and avoids the painful CS crashes.
According to the TESAnnwyn help file, a 16-bit RAW image file has a range of 65536 (-32768 to +32767) TES Height Units (THU), 524 288 (-262 144 to +262 136) Game Units (GU) and 7 471m. 1 THU is 8 GU and multiplying GU by 0.1428767293691635 will give the height in cm.
Testing my Height map
I started by using a 16-bit grayscale RAW, that goes from 100% (black) to 3% (almost white). I made it by using the gradient tool in PS. After running it with the TESAnnwyn to make an .esp, I check it out in the CS with the height map editor (right). I got some puzzling effects, not a nice hill as expected.
Each color represent a height in THU, from 0-65535. If the height differens in the map is to great it introduses rips in the textures around 20 000 units. This makes the map starta at minimum levels instead of continuing up (dark blue).
The color map from the heightmap editor:
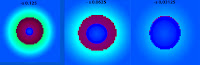
In TESAnnwyn it is possible to scale the height values with the –s function. I tried scaling with 0.125 (1/8), but as you see the height still hits the roof and starts at minimum, but just once (left, the dark lilac color). Scaling more 1/16 (-s 0.0625, middle) and 1/32 (-s 0.03125, right) does not fix this problem, only makes the height range more flat.
The only thing I can figure out that solves this is not using the full range of color in the original height map. I made a new RAW file ranging from 100% to 51% black. Now the slope is less, and I get the full 65 535 GU. The height still hits the roof and turns negative (left). With scaling of 1/2 (-s 0.5) and the use of another function, height alteration, -h of -8192 units, I have a height map that uses full range of GU and don't flip to min in height (right). According to the TESAnnwyn the height range of my map is -116 to 3544m without scaling and -116 to 1713m with. This is with the setting -h -8192, without this adjustment the map will flip to negative, and there will be nothing at sea level (-h - 4096).
Now I just have to see if this works with my real map :)
/E

PS.
Well it turned out I needed to do some more testing to make things work, see the next post.

Hello World

Some introductions are in order.
This blog is created to document of the development of a standalone massive mod, Hoddminir.
The project started some years ago with a pen and paper DnD role-playing game where I was the gamemaster, my first time as one I must add. I put massive amounts of time into the world design. Drawing maps, writing the history, thinking up interesting characters and rewriting DnD rules to fit the world I wanted. And I loved it :)
Nothing beats the completely unexpected behavior of your players exploring your world and making it their own. But nothing last forever, today most of the gaming group has moved, to different cities, countries and hemispheres (!). And on my computer is a huge folder of an entire world just sitting there, full of ideas.
Well, what to do?
What if I made the world in a computer game...
But I know nothing of programing, so I started out in Never Winter Nights 2, it had a pretty nice Tool Set for making mods. After a lot of frustration I had manged to learn enough to make nice areas, but the limitations of the game made me give up. I wanted some thing that felt alive.
And here is were TES4 Oblivion comes in. No more small closed areas, but beautiful big world to explore and nice NPCs.
I downloaded the Construction Set, a modding tool developed for Oblivion, and started playing around. It was hard. But I am now starting to get the hang of things, largely with the help of an excellent Wiki.
Now I'm working on a height map and testing it out in the game, learning about LOD meshes, textures, maps and unfortunately the limitations of Oblivions Construction set. My idea of a HUGE world looks to be impossible in Oblivion, but it can handle a big one, with some workarounds. And then there is TES5 Skyrim, the new game that will come in November. From what I have seen it looks amazing, with nice thing from a modders point of view, like running water, actual falling snow, real-time conversations with NPC and occupations for players and NPCs. And of course there will be a Construction set for Skyrim.
For the first time ever I can't wait for the Swedish rainy, dark and cold November :)

/E